Implementation and simulation of a Bingo-Ball 75 game as part of a study project for the module stochastics for computer scientists
Entry
As part of a study project, I have written a code to play bingo in a very simple version.
The Bingo.java creates a multidimensional matrix with 5×5 fields as an 2D-array, generate 20 (default) pseudo-random numbers with a mersenne-twister (seed: 2^19937 -1), set them in a hashset to be unique between the array, generate 5 more numbers with the same periodity in antoher hashset as the “conférencier” and compare the arrays.
If there are the 5 numbers equal to five numbers in the cardset, the code try to find if the numbers are in a row, a colum or diagonal.
When they are, the code throws a “BINGO”
Statics
The Bingo-Code is also ready to analyze the game. It write out where the win was, how many numbers are equal to the drawn numbers and throw a win-boolean.
Simulation-Class
There is also a CSimulator-Class to play the game automatically and take the information about the last situation. At the end of the iteration, there are methods to build a summary of all things like, equality-counter, wins, row-wins, column-wins, diagonal-wins and the sum of all games.
There is a method to export the values in a csv via ICSVFileWriter which uses the OPEN-CSV Lib.
License
The code is for free-use only, not for commercial use!
All rights reserved!
Sources
All used sources, documents and code-examples are placed in the whitepaper.
Sheets
The csv-Sheets are generated by the CSimulator-Class and are part of the paper.
Monkey programming language compiler designed in Writing A Compiler In Go (Ball, T. 2018). The book is awesome and I believe every programmer who mainly uses dynamically typed languages such as Ruby or Python should read it.
This implementation has added several features to the one implemented in the above book:
Added support for running a single Monkey script file
Added support for single-line comments (#)
Added support for floating-point numbers and their arithmetic (+, -, *, /) and comparison (<, >, ==, !=) operations
Added support for “greater than or equal to” (>=) and “less than or equal to” (<=) comparison operators
Added support for logical AND (&&) and OR (||) operators
Added support for variable assignment statements without let keyword
Added support for variable reassignment statements
Added support for setting values into existing arrays and hash maps
Added support for nil literal
Prerequisites
Go 1.12 or later is required to build the compiler.
Usage
Install the Monkey compiler using go get command:
$ go get -v -u github.com/skatsuta/monkey-compiler/...
The easiest way to get started is to run REPL:
$ $GOPATH/bin/monkey-compiler
This is the Monkey programming language!
Feel free to type in commands
>> puts("Hello, world!")
Hello, world!
>>
The compiler also supports running a single Monkey script file (for example script.monkey file):
You can define and reassign to variables using = operator. Variables are dynamically typed and can be assigned to objects of any type in Monkey. You can use let keyword when defining variables, but it’s completely optional and there is no difference between with and without let keyword.
Two number types are supported in this implementation: integers and floating-point numbers.
>>let a = 1;# Assignment with `let` keyword>> a
1
>> b = 2.5;# Assignment without `let` keyword>> b
2.5
>> b = "a";# Reassignment to b>> b
a
Arithmetic and comparison expressions
You can do basic arithmetic and comparison operations for numbers, such as +, -, *, /, <, >, <=, >=, ==, !=, && and ||.
>>let a = 10;>>let b = a * 2;>> (a + b) / 2 - 3;
12
>>let c = 2.25;>>let d = -5.5;>> b + c * d
7.625
>> a < b
true>> c == d
false
If expressions
You can use if and else keywords for conditional expressions. The last value in an executed block is returned from the expression.
>>let a = 10;>>let b = a * 2;>>let c = if (b > a) { 99 } else { 100 };>> c
99
>>let d = if (b > a && c < b) { 199 } else { 200 };>> d
200
Functions and closures
You can define functions using fn keyword. All functions are closures in Monkey and you have to use let along with fn to bind a closure to a variable. Closures close over an environment where they are defined, and are evaluated in the environment when called. The last value in an executed function body is returned as a return value.
>>let multiply = fn(x, y) { x * y };>> multiply(50 / 2, 1 * 2)
50
>> fn(x) { x + 10 }(10)
20
>>let newAdder = fn(x) { fn(y) { x + y }; };>>let addTwo = newAdder(2);>> addTwo(3);
5
>>let sub = fn(a, b) { a - b };>>let applyFunc = fn(a, b, func) { func(a, b) };>> applyFunc(10, 2, sub);
8
Strings
You can build strings using a pair of double quotes "". Strings are immutable values just like numbers. You can concatenate strings with + operator.
You can build arrays using square brackets []. Array literal is [value1, value2, ...]. Arrays can contain values of any type, such as integers, strings, even arrays and functions (closures). To get an element at an index from an array, use array[index] syntax. To set a value at an index in an array to another value, use array[index] = value syntax.
You can build hash maps using curly brackets {}. Hash literal is {key1: value1, key2: value2, ...}. You can use numbers, strings and booleans as keys, and objects of any type as values. To get a value under a key from a hash map, use hash[key] syntax. To set a value under a key in a hash map to another value, use hash[key] = value syntax.
>>let myHash = {"name": "Jimmy", "age": 72, true: "yes, a boolean", 99: "correct, an integer"};>> myHash["name"]
Jimmy
>> myHash["age"]
72
>> myHash[true]
yes, a boolean
>> myHash[99]
correct, an integer
>> myHash[0] = "right, zero">> myHash[0]
right, zero
Built-in functions
There are some built-in functions in Monkey.
len
len built-in function allows you to get the length of strings or arrays. Note that len returns the number of bytes instead of characters for strings.
rest built-in function allows you to create a new array containing all elements of a given array except the first one. If the array is empty, rest returns nil.
You can write single-line comments by starting with #. Comments begin with a hash mark (#) and continue to the end of the line. Thery are ignored by the compiler.
>># This line is just a comment.>>let a = 1;# This is an integer.
1
Macros
You can define macros using macro keyword. Note that macro definitions must return Quote objects generated from quote function.
# Define `unless` macro which does the opposite to `if`>>let unless = macro(condition, consequence, alternative) {
quote(
if (!(unquote(condition))) {
unquote(consequence);
} else {
unquote(alternative);
}
);
};>> unless(10 > 5, puts("not greater"), puts("greater"));
greater
nil
Example
Here is a Fibonacci function implemented in Monkey:
fibonacci.monkey
let fib = fn(x) {
   if (x <= 1) {
     return x;
   }
   fib(x - 1) + fib(x - 2);
};

let N = 15;
puts(fib(N));
Runs the app in the development mode.
Open http://localhost:3000 to view it in your browser.
The page will reload when you make changes.
You may also see any lint errors in the console.
npm test
Launches the test runner in the interactive watch mode.
See the section about running tests for more information.
npm run build
Builds the app for production to the build folder.
It correctly bundles React in production mode and optimizes the build for the best performance.
The build is minified and the filenames include the hashes.
Your app is ready to be deployed!
See the section about deployment for more information.
npm run eject
Note: this is a one-way operation. Once you eject, you can’t go back!
If you aren’t satisfied with the build tool and configuration choices, you can eject at any time. This command will remove the single build dependency from your project.
Instead, it will copy all the configuration files and the transitive dependencies (webpack, Babel, ESLint, etc) right into your project so you have full control over them. All of the commands except eject will still work, but they will point to the copied scripts so you can tweak them. At this point you’re on your own.
You don’t have to ever use eject. The curated feature set is suitable for small and middle deployments, and you shouldn’t feel obligated to use this feature. However we understand that this tool wouldn’t be useful if you couldn’t customize it when you are ready for it.
This paper presents a novel approach to the image inpainting problem using a Generative Adversarial Network (GAN) architecture. We undertook a formal optimization process on an existing EdgeConnect model to improve its performance in a specific domain.
The method proposed in this paper achieved a precision of 28%, recall of 25% and, feature matching loss of 25% while keeping the number of iterations at bare minimum of 175,000. In contrast, EdgeConnect [1] achieved precision of 27%, recall of 25% and, feature matching loss of 45%.
Our model can be useful for various image editing tasks such as image completion, object removal and image restoration, where fine details are crucial. Our approach addresses the limitation of current state-of-the-art models in producing fine detailed images and opens new possibilities for image inpainting applications.
The book is aimed at researchers, practitioners, and students in the fields of computer vision, image processing, and deep learning who are interested in learning about the latest advancements in image inpainting and how to improve current methods.
Prerequisites
Python 3
PyTorch 1.13
Eel 0.16
scikit-image
opencv 4.5.4.60
Optional
The development was utlizing PyCharm IDE by JetBrains
Installation
Cloning repo
git clone https://github.com/MoshPe/InpaintGAN.git
cd InpaintGAN
Install Python dependencies
pip install -r requirements.txt
Dataset
We use HumanFaces datasets. To train the model on the dataset please download the dataset from Kaggle website with your registered user.
Warning The dataset must contain only images with any type of jpg, jpeg, png and the folder path Must be in english !!!
Getting Started
Training
To train the model simply run main.py to open up Eel GUI to operate in system.
Head over to train tab and configure the model.
Select what model to train, method of masking an image and which edge detection model to utilize
Hit next for further configuring the model
In the following section is the configuration of both generator and discriminator for Edge and Inpaint models accordingly.
Option
Default
Description
LR
0.0001
learning rate
D2G_LR
0.1
discriminator/generator learning rate ratio
BETA1
0.0
adam optimizer beta1
BETA2
0.9
adam optimizer beta2
BATCH_SIZE
8
input batch size
INPUT_SIZE
256
input image size for training. (0 for original size)
SIGMA
2
standard deviation of the Gaussian filter used in Canny edge detector (0: random, -1: no edge)
MAX_ITERS
2e6
maximum number of iterations to train the model
EDGE_THRESHOLD
0.5
edge detection threshold (0-1)
L1_LOSS_WEIGHT
1
l1 loss weight
FM_LOSS_WEIGHT
10
feature-matching loss weight
STYLE_LOSS_WEIGHT
1
style loss weight
CONTENT_LOSS_WEIGHT
1
perceptual loss weight
INPAINT_ADV_LOSS_WEIGHT
0.01
adversarial loss weight
GAN_LOSS
nsgan
nsgan: non-saturating gan, lsgan: least squares GAN, hinge: hinge loss GAN
Running and training the model.
2023-06-23.12-58-53.online-video-cutter.com.1.mp4
Inference
In this step the model is utilized for testing. Uploading and image, creating a mask on the uploaded image and run the model on the masked image.
1. Open Inference tab
2. Upload Image
3. Mask image
In this section the user is able to draw the mask onto the image for the model to fill.
The user can choose between several thicknesses of lines to draw and clear the drawn lines.
Warning The model was trained upon a square mask so different kind of drawing might won’t return the expected results.
@inproceedings{nazeri2019edgeconnect,
  title={EdgeConnect: Generative Image Inpainting with Adversarial Edge Learning},
  author={Nazeri, Kamyar and Ng, Eric and Joseph, Tony and Qureshi, Faisal and Ebrahimi, Mehran},
  journal={arXiv preprint},
  year={2019},
}

@InProceedings{Nazeri_2019_ICCV,
  title = {EdgeConnect: Structure Guided Image Inpainting using Edge Prediction},
  author = {Nazeri, Kamyar and Ng, Eric and Joseph, Tony and Qureshi, Faisal and Ebrahimi, Mehran},
  booktitle = {The IEEE International Conference on Computer Vision (ICCV) Workshops},
  month = {Oct},
  year = {2019}
}
Runs the app in the development mode.
Open http://localhost:3000 to view it in the browser.
The page will reload if you make edits.
You will also see any lint errors in the console.
npm test
Launches the test runner in the interactive watch mode.
See the section about running tests for more information.
npm run build
Builds the app for production to the build folder.
It correctly bundles React in production mode and optimizes the build for the best performance.
The build is minified and the filenames include the hashes.
Your app is ready to be deployed!
See the section about deployment for more information.
npm run eject
Note: this is a one-way operation. Once you eject, you can’t go back!
If you aren’t satisfied with the build tool and configuration choices, you can eject at any time. This command will remove the single build dependency from your project.
Instead, it will copy all the configuration files and the transitive dependencies (webpack, Babel, ESLint, etc) right into your project so you have full control over them. All of the commands except eject will still work, but they will point to the copied scripts so you can tweak them. At this point you’re on your own.
You don’t have to ever use eject. The curated feature set is suitable for small and middle deployments, and you shouldn’t feel obligated to use this feature. However we understand that this tool wouldn’t be useful if you couldn’t customize it when you are ready for it.
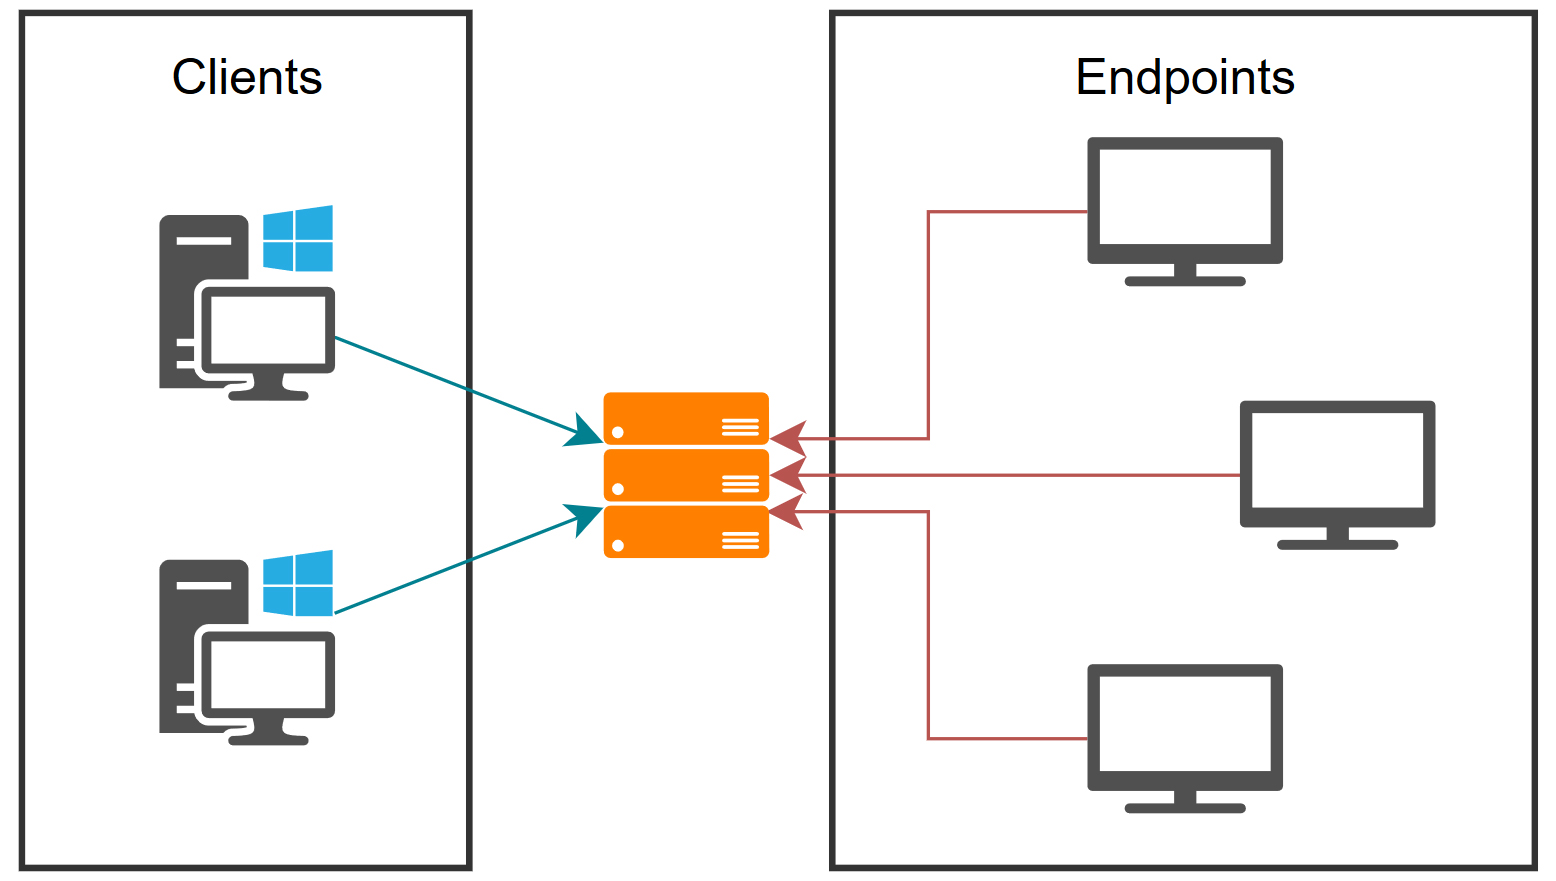
System designated to implement in company easy TV display system.
It allows deploy TVs (endpoints) based on linux (e.g. Raspberry Pi) and manage all of them using single pc.
Client – that allows to manage system (change settings etc.)
Main purpose of this system is to allow you to easily setup display system (e.g. in company) and give you user-friendly access to manage it.
Very important is that, this system is opensource, so you can customize it how you want and adapt to your needs.
🕹 Usage
Install server on linux machine that will have access to connect to endpoints and will give access for clients to connect.
After installation and configuration you need to allow connections on firewall to server port.
Next step will be deploying endpoints.
Follow installation process, and after that you can add your endpoints in server configuration.
You can also deploy endpoints on the go (when server is running), but you will need to restart server after changing configuration.
Server and Endpoints are using syslog to write some logs. This allows you to verify if everything is working.
Client allows you to manage system.
When server starts you will be able to connect to it using client and change configurations.
You need to provide address, port and credentials to connect to server.
All new endpoints will use global configuration if config is not found.
📦 Installation
Server
To install server daemon you need to build and create default config files. To do that just run below command in repo directory:
sudo make clean install
Server do not require any external libraries
If you don’t want to override your configs use (probably temporary solution):
sudo make clean ndinstall
Next important step will be configuration of basic settings – read here
After that you can simply run tmsd.service. Ex:
systemctl start tmsd
You can verify if everything is correctly running in syslog.
To disable daemon just stop service. Ex:
systemctl stop tmsd
Client
Download installer .msi or portable version from Releases.
for installer follow simple installation process (by default client is installed in C:\Program Files (x86)\23vbq\TMSC)
for portable just extract .7z file (dll’s must be in same directory as executable)
If you want to build client by your self you need to download and install Qt,
clone repository and open project from CMakeLists.txt.
To deploy your build you can use windeployqt tool which is installed with Qt.
It will copy all required libraries to directory with executable.
Also you can use AdvancedInstaller template to deploy it in installable package.
After configuring endpoint you can add it to server configuration.
To start endpoint you need to add it to your .xinitrc.
If you don’t know how to do this here is xinit configuration.
Installed binaries are in /usr/bin by default.
To run endpoint application use:
startx
Required packages
xorg-server
xorg-xinit
For closing endpoint there are two methods:
Kill it from shell (ex. pkill tmse)
Use keyboard shortcut ALT + Q
📜 Description
Server
Linux
Server is responsible for managing the entire system. It’s primary role is to communicate with endpoint to distribute configuration and manage them. The server doesn’t hosts any resources (e.g. images, files). These can be obtained with external solutions like Samba. Server performs various functions including: processing change requests, providing responses to queries, checking the connection with the endpoints, and ensuring that client is always updated with latest configuration.
Server also provides interface to manage configurations, endpoints and server it self with Client application.
Network functions:
Accepts connection from clients and response to their queries
Connects to endpoints and sends data to them
Client
Windows
Client application gives end-user ability to easily manage the system. It provides GUI based communication with server, so it is user-friendly. You can check actual status of endpoints, manage global / per endpoint configuration and reload endpoints settings.
Endpoint
Linux
Endpoint allows to display images on TV (any display connected to machine), using X11 library.
Its main advantage is that is written in C++, so it allows to obtain low system requirements. That allows you to make low cost and practical display system (e.g. TV connected to Raspberry Pi).
Endpoint program gets settings from server. Files to be displayed are obtained from provided path. To make fully centrally managed system (meaning easy access to files on endpoint) you can setup SMB server, mount it on every endpoint and configure path on tv-managing-system server to this mountpoint.
⚙ Configuration
After configuration you can copy your config files to .def files in repo to not be overridden after installing.
In future maybe there will be provided some mechanism to not override your files and easily update configs, if new variables will be required.
Server
Server configuration is stored in /etc/tmsd/.
Default settings are stored in def files in repo and are copied to desired location when installing.
Server uses two files for it’s configuration:
settings.cfg – to store basic server socket settings
authkey – to store authentication key for server (now it is stored in plain text – read here])
File settings.cfg stores configuration of basic server socket settings and also list of endpoints, that server needs to connect to.
You need to add your endpoints here.
Name – unique name of endpoint Ip – address of endpoint Port – port on that endpoint is listening AuthKey – key to authenticate connection to that endpoint
In authkey you only need to store your server password (in plain text), that will need be required for clients to connect.
Configuration of each endpoint is stored in /etc/tmsd/epconf/ and is automatically generated by server on changes.
By default endpoint configuration is empty struct.
Global endpoint configuration is stored in file named [Global Settings].ep.
Important
Names of endpoint configurations are created from their names, so name definied in settings.cfg must be unique
Client
At this point client do not store any settings. Maybe in future it will be able to save IP, certificates etc.
Endpoint
Endpoint configuration is stored in /etc/tmse.
Default settings are stored in def files in repo and are copied to desired location when installing.
authkey – to store authentication key for server (now it is stored in plain text – read here)NOW IS UNUSED – wait for update
By default endpoint is using feh, but it can be to any image viewer.
You can set up any command you want for opening images (through settings.cfg). Opening images is implemented in SlideshowManager::OpenAllImages().
Endpoint do not store major configuration (meaning directory to lookup for images, etc.).
It is provided by server when connection occurs. It prevents endpoint from loading old configuration.
Endpoint waits for server and then will be able to display desired views.
This configuration is stored in EndpointSettings struct in memory.
🔐 Security
At this point of developement all connections are not secured (in plain text). Also passwords are stored in plain text.
It is planned to implement hashed passwords and SSL secured connections.
Caution
Now this project probably doesn’t meet any security standards.
(The project was created mainly for learning purposes – maybe in future will be improved)
🇺🇦 Простий бот повітряних тривог для вашого Discord серверу. Ви можете безкошновно створити власного бота та розмістити його на власному віддаленому сервері (наприклад на Oracle Cloud Free Tier) за допомогою цієї інструкції, або використовувати готове рішення на вашому Discord серверу. Бот використовує стороннє API.
🇬🇧 A simple air-raid bot for your Discord server. You can create your own bot for free and place it on your own remote server (e.g. on Oracle Cloud Free Tier) using these instructions, or use a ready-made solution on your Discrod server. Bot uses API.